
PowerSchool Data Exchange
Prior to publishing with Ed-Fi, you must enable and configure the PowerSchool Data Exchange (DEX). The following are general setup instructions for PowerSchool Data Exchange. You may have additional settings for your installation. Refer to your state documentation for detailed technical instructions specific to your installation. Refer to Data Exchange Settings for additional configuration information.
Install and Load Configuration Files
These configuration files are loaded by the State Reporting installer for state instances or by the PowerSchool Services Group for individual districts using Ed-Fi.
-
For sites with multiple App Node Servers:
-
Navigate to Setup > System > Server Array Settings > Server List.
-
Make note of the "APP NODE" listed at the bottom left of the page.
-
Find the corresponding entry in the server list and make note of the hostname.
-
-
Copy and replace the unzipped ED-FI Configuration source file into this location: "\\[hostname]\c$\Program Files\PowerSchool\application\components\reporting-common-{version-number}\config.
Note: Only enter the hostname if you have multiple App Node Servers. -
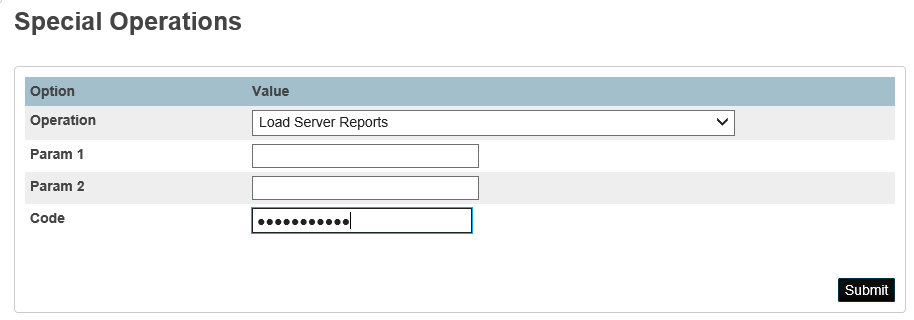
Login to PowerSchool SIS and navigate to Setup > System > Data Management > Special Operations.
-
Select Load Server Reports, enter "solo flight" (with a space in between) for the Code.
-
Leave the Param 1 and Param 2 prompts blank and Submit.
NOTE: This may take anywhere between seconds to a few minutes depending if the configuration file is loaded for the first time or has been previously loaded.
Enable PowerSchool Data Exchange Plugin
PowerSchool Data Exchange (DEX) is delivered to PowerSchool as a plugin. You must enable the plugin to be able to have access to the data exchange components, such as Ed-Fi. The DEX Plugin is installed automatically as part of state reporting releases and can be enabled by navigating to the Plugin Management Dashboard.
To access the Plugin Management Dashboard, sign in to PowerSchool at the district level.
-
Navigate to System > System Settings > Plugin Management Configuration
-
In the Plugin Management Dashboard, select the Enable/Disable checkbox next to PowerSchool Data Exchange (DEX).
-
Click PowerSchool Data Exchange (DEX).
-
In the PowerSchool Data Exchange (DEX) Setup page, click Profile Configuration.

-
Click Add Profile.
-
Enter a Profile Name.
Note: This name shows in the Data Exchange menu list in the main menu. PowerSchool recommends keeping the name under 20 characters. -
Select the Profile Type.
Note: If you do not see a value on the Profile Type menu, it means that the configuration files have not yet been loaded. These files are loaded by the State Reporting installer for state instances or by the PowerSchool Services Group for individual districts using Ed-Fi. -
Select Enabled On, and Save the profile.
-
When a plugin is updated, PowerSchool may disable the plugin for security reasons to require a review of the changes and again agree to the terms and conditions for using the software. After a release is installed, verify that all applicable plugins are enabled.
Configure PowerSchool Data Exchange
The Data Exchange Setup page provides a user interface for entering various configurable settings including enabling and disabling the entire framework, authentication, and operational frequencies. PowerSchool supports multiple LEAs in a single instance. The setup page contains a section where the individual authentication keys and secrets are entered for each LEA through the Configure hyperlink.
-
Navigate to Setup > System > Data Exchange > General Setup.
-
On the Data Exchange Setup page, select System Enabled On.
-
Select the Profile Name.
Important Note: All Communication Settings are profile specific. Verify that you have selected the correct profile before making the following changes. -
Edit the following:
-
In the LEA section, click Configure and edit the following:
-
Enable the LEA.
-
Enter the Authentication Key.
-
Enter the Authentication Secret.
-
Test the connection and save the communication settings.
-
-
Save the configuration.
Ed-Fi Dashboard
The Ed-Fi Dashboard profile links are located on the main menu, under the Data Exchange heading. Links to the Ed-Fi Dashboards will display if the DEX plugin is enabled and the Ed-Fi profile setup is complete.
-
On the start page, choose a profile under Data Exchange in the main menu. This will open the Ed-Fi dashboard for the selected profile. Refer to Working with Ed-Fi for additional information on how to use the Ed-Fi dashboard.
Periodically review the Ed-Fi Dashboard to resolve errors and dependencies and ensure “On Demand” categories like Attendance are scheduled to run periodically. Refer to Data Views and Publish Data for more information.
Next Step
The next step in the setup process is to download state-provided data.