
SIF Zones are defined and managed by a Zone Integration Server (ZIS), not by the PowerSchool Agent. Before you can configure the Agent to connect to a zone, that zone must first be created and configured in the ZIS that you will be connecting to.
Before proceeding, gather the following information:
-
The IP address or hostname of the ZIS.
-
The protocol used by the ZIS (e.g. HTTP or HTTPS)
-
The port number of the ZIS.
-
The Zone ID (e.g. "CLEMENTS_MS")
Next, follow these steps to define each school zone to which the Agent will connect:
-
Start the Agent.
-
Click on the PowerSchool icon on the system tray to open the Console.
-
Click Connect.
-
From the main menu of the Console, choose File > New Zone.
-
The New Zone dialog box is displayed.
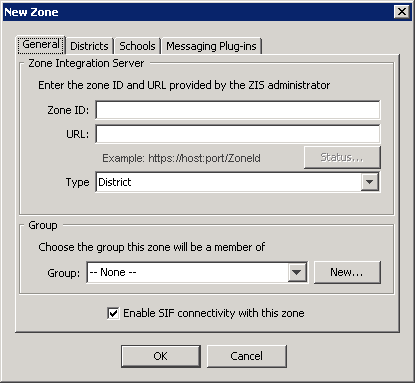
Fill in the Zone Integration Server fields:Field
Description
Zone ID
The ID of the zone. This value is case-sensitive and must precisely match the zone ID on the Zone Integration Server that manages this zone
Zone URL
The URL to connect to the Zone Integration Server that manages this zone. The ZoneID's are generally case sensitive and must be entered exactly as it appears in the ZIS.
Zone Type
School, Aggregate, or District; this setting determines zone "membership," which can be a one or more schools, or one or more districts.
Zone type determines the New Zone dialog: selecting "Aggregate" zone type will result in the display of the General and Zones tabs; selecting "School" zone type results in the display of the General and Schools tabs; selecting "District" zone type results in the display of the General, Districts, and Schools tabs.
-
Select "School" from the Zone Type drop-down list.
-
The New Zone dialog now displays the "Schools" tab, in addition to the "General" tab.
-
Choose the Group, if any, for this zone.
-
Check "Enable SIF connectivity with this zone."
-
Click on the Schools tab, and select the school(s) you wish to add to the zone.
-
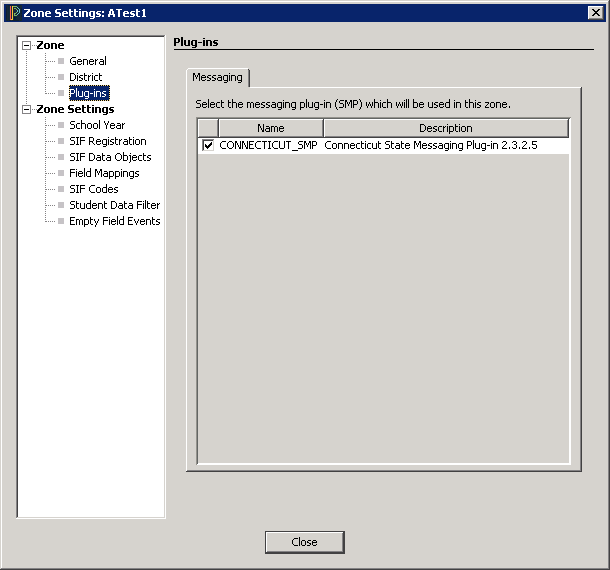
Click on the Messaging Plug-ins tab.
-
The State Messaging Plug-ins (SMPs) installed for the SIF Agent are displayed in the New Zone page> Messaging Plug-ins tab. (For more information about Plug-ins, see the Plug-ins section of Chapter 6, Agent Configuration.)
-
Select a Plug-in from the list in the Messaging Plug-ins tab. Mappings and data filtering contained in the selected SMP will be applied to this zone.
-
Click OK to save your changes. The new zone is added to the main window of the Console.