Creating District Zones
- Start the Agent.
- Click on the PowerSchool icon on the system tray to open the Console.
- Click Connect.
- From the main menu of the Console, choose File > New Zone.
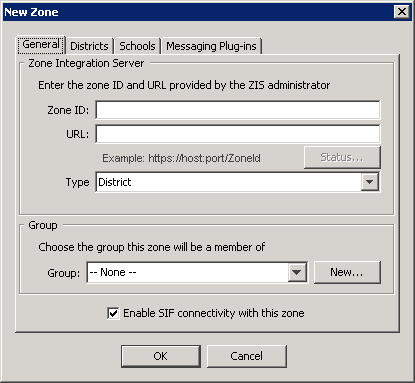
- The New Zone dialog box is displayed.

Fill in the Zone Integration Server fields.
Field
Description
Zone ID
The ID of the zone. This value is case-sensitive and must precisely match the zone ID on the Zone Integration Server that manages this zone
Zone URL
The URL to connect to the Zone Integration Server that manages this zone. The ZoneID is generally case sensitive and must be entered exactly as it appears in the ZIS.
Select the Zone type.
Field
Description
Zone Type
School, Aggregate, or District; this setting determines zone "membership," which can be a one or more schools, or one or more districts.
Zone type determines which tabs are displayed in the New Zone dialog:- Selecting "Aggregate" zone type will result in the display of the General and Zones tabs
- Selecting "School" zone type results in the display of the General and Schools tabs
- Selecting "District" zone type results in the display of the General, Districts, Schools, and Messaging Plug-ins tabs.|
- Choose the Group, if any, for this zone.
- Check "Enable SIF connectivity with this zone."
- Click on the Districts tab, and select the district you wish to add to the zone.
- Click on the Schools tab; from the list of schools in the district, select schools to participate in this zone.
- Click on the Messaging Plug-ins tab, and select the SMP you wish to apply to this zone. (For more information about Plug-ins, see the Plug-ins section of Chapter 6, Agent Configuration.)
- Click OK to save your changes. The new zone is added to the main window of the Console.
