
The Write Back feature allows other applications in the SIF zone to update the PowerSchool application with data from the other applications by publishing SIF events or initiating synchronization in the PowerSchool SIF Agent.
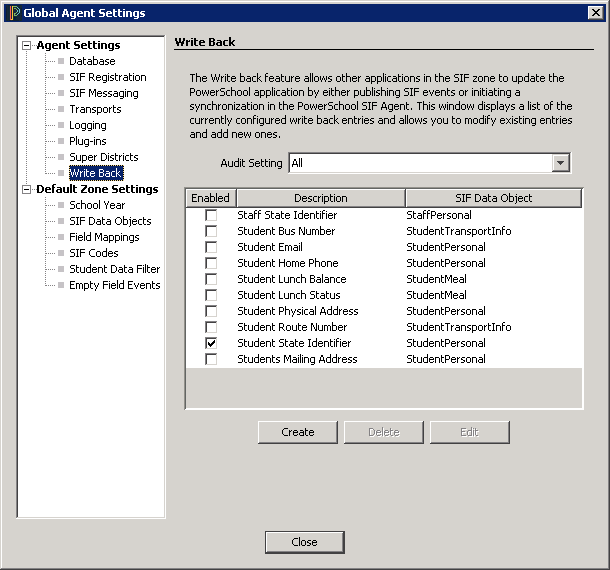
Write Back Screen
The Write Back screen displays the following drop-downs, columns, and control buttons:
Audit Setting Drop-down

Selections in the Audit Setting drop-down determine which SIF Data Objects will be written to a special table in the PowerSchool application database, providing detailed information for use by PowerSchool administrators in auditing data flow and content.
Audit Setting > Default: This setting will write to the audit table only the data that is required by PowerSchool. (The list or specification of default audit data is available only to PowerSchool administrators.)
Audit Setting > All: This setting will write all the data, for every SIF Data Object supported by the PowerSchool SIF Agent, to the special auditing table in the PowerSchool application database.
Write Back Screen Columns
The main window of the Write Back screen displays currently configured Write Back entries. Columns in the Write Back screen include:
Enabled: Check this box to enable a Write Back entry for a SIF Data Object. (Note that the Agent is installed with a "default" list of possible Write Back entries; these entries can be enabled, disabled, or edited, but cannot be deleted.)
Description: The data that will be updated.
SIF Data Object: The object from which the data will be drawn.
Write Back UI Control Buttons
The Write Back screen displays the following buttons for managing Write Back entries:
Create: Click this button to display the Create Write Back Item screen and initiate the process for creating a Write Back entry. (See "Creating a Write Back Entry".)
Delete: This button is active only upon selection of a Write Back entry you created; there is no way to delete the "default" list of Write Back entries displayed in the main Write Back screen; these entries can only be edited, enabled, or disabled. (See "Deleting a Write Back Entry".)
Edit: Click this button to display the Edit Write Back Item screen. From this screen, you can modify selected Write Back entries.
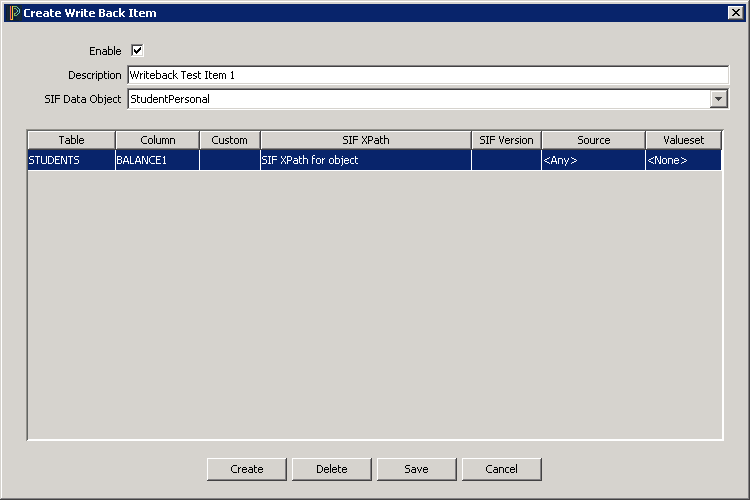
Creating a Write Back Entry
-
Start the PowerSchool SIF Agent.
-
From the main console, go to File > Agent Settings > Write Back.
-
The Write Back window is displayed.
-
Click the Create button.
-
The Create Write Back Item window opens.
-
Check the Enable box at the top of the screen. (You can also enable the entry later, on the Write Back screen.)
-
Type a description into the Description field. (Choose a title or phrase with which you can easily identify the Write Back entry you want to create.)
Note: The Create Write Back command buttons are inactive until a description is entered. -
Choose a SIF Data Object from the SIF Data Object drop-down. (Currently, the default objects for which you can create a Write Back entry are StaffPersonal, StudentMeal, StudentPersonal, and StudentTransportInfo.)
-
Click Create.
The columns in the Create Write Back window are activated with drop-downs and data fields for defining the Write Back entry.
Table: This drop-down lists the PowerSchool database tables that will accommodate the Write Back entry you are creating.
Column: This drop-down lists the location (column field) within the PowerSchool database table where the Write Back data will be used. When wanting to write back extended schema fields, use the Custom field name.
Custom: This drop-down lists the location (custom column field) within the PowerSchool database table where the Write Back data will be used. Some PowerSchool tables have a Custom column (Students and Teachers, for example) which allows additional data to be associated with that record. Using pseudo column names, additional data can be stored in the Custom column as key=value pairs for each record in the table. For example, one of the pseudo column names in the Students table is Graduation Date. A Graduation Date=2011 key value pair can then be stored in the Custom column (with other key value pairs) for each record in the Students table. When using extended schema fields, find the field based on the Table.Fieldname value.
SIF XPath: Enter the path through which SIF data should flow for this Write Back entry.
SIF Version: Select the version of SIF with which this Write Back entry should comply.
Source: Identify the source of the data this Write Back entry will manage.
Valueset: Valuesets translate SIF specification values to PowerSchool application values. If translation between SIF values and application values is required, choose the valueset which provides the correct translation. This may require creation of a new valueset. (For more detailed information about existing valuesets, see the PowerSchool SIF Agent Mappings Guide.) -
Click Save.
-
The Write Back window is returned, displaying the new entry.
Deleting a Write Back entry
Note: The "Delete" button is activated only upon selection of a Write Back entry you have created. The list of default Write Backs in the main Write Back screen cannot be deleted, only enabled (by checking the Enabled box for that data row), disabled (by clearing the Enabled box for that data row), or edited (by selecting the Edit button).
-
Start the PowerSchool SIF Agent.
-
From the main console, go to File > Agent Settings > Write Back.
-
The Write Back window is displayed.
-
Select the entry you wish to delete.
-
Click Delete.
-
The selected Write Back entry is deleted, and the list is refreshed.
Editing a Write Back entry
-
Start the PowerSchool SIF Agent.
-
From the main console, go to File > Agent Settings > Write Back.
-
The Write Back window is displayed.
-
Select the entry you wish to edit.
-
Click Edit.
-
The Write Back Item screen is displayed.
-
Change the Table, Column, Custom, SIF XPath, SIF Version, Source, or Valueset of the selected Write Back entry.
-
Click Save.
-
The Write Back screen returns, displaying the modified Write Back entry.
Extended Schema Fields
As of version 3.3.4, the SIF Agent is able to write back into extended schema fields for Students and Staff. To write into an extended schema table, under Column choose CUSTOM. Then, in the Custom column, find the extended schema field name. This will be in the form of Table.FieldName.