
Updating Gifted Child Tables Using Data Export and Data Import Managers
This document has two sections:
Clearing current year 'Service' entries
Updating current year fields – Screeing, Assessment, Service, Identification or Identification Date
TO CLEAR 'SERVICE' ENTRIES ON THE CURRENT GIFTED TABLE
The State EOY process did not include clearing entries on the Gifted Tab for students who were served in the previous school year. Only entries for Screening and Assessment were cleared on the current Term, if the update process was chosen for the Gifted tab.
Identify students as 'Served'
Go to the Data Export Manager - Start Page > System > Page and Data Management > Data Export Manager
Select Columns to Export:
Category = Database Extensions
Export From = S_OH_STU_GIFTED_C (DO NOT CHOOSE - S_OH_STU_GIFTED_SNAP_C OR S_OH_STU_GIFTED_TMP_C)
Select the following fields from the STUDENTS.S_OH_STU_GIFTED_C Table
ID
StudentsDCID
Service
Type
Select the following field from the STUDENTS Table (optional)
LastFirst

e. Click 'Next'
3. Select/Edit Records from S_OH_STU_GIFTED_C:
a. Built In Filters – If the "Use current student selection: X box is checked, uncheck if students have not been preselected. If students have been preselected, leave box checked, if appropriate.
b. Column Filter – Select 'service' and check the box
c. Select 'Export Filtered Rows'.
d. Click 'Show Records'.

4. Select 'Edit All Filtered Records'

5. Click radio button for 'service' and select Submit – Served records for all areas will be deleted.

6. Verify appropriate records have been cleared in PowerSchool.
MASS UPDATING STUDENT GIFTED RECORDS BY GIFTED TYPE (area of giftedness)
Identify Students to be Updated
To identify the students to update, preselect the students in PowerSchool
Creating File(s) to Import
2. Do a Quick Export for the selected students and save the file.

3. Determine if any gifted records exist in the Gifted table for selected students for a specific Gifted Type (example is for Reading) (See legend at end of document for gifted type codes)
Go to the Data Export Manager - Start Page > System > Page and Data Management > Data Export Manager
Select Columns to Export:
Category = Database Extensions
Export From = S_OH_STU_GIFTED_C (DO NOT CHOOSE - S_OH_STU_GIFTED_SNAP_C OR S_OH_STU_GIFTED_TMP_C)
Select ALL fields from the STUDENTS.S_OH_STU_GIFTED_C Table
ID
StudentsDCID
Assessment
Identification
Identification_Yr_Mon
Screening
Service
Type
Select the following field from the STUDENTS Table (recommended)
LastFirst
Click 'Next'
Select/Edit Records from S_OH_STU_GIFTED_C:
Built In Filters – If the "Use current student selection: X box is checked, uncheck if students have not been preselected. If students have been preselected, leave box checked, if appropriate.
Column Filter – Select Type and enter the Type code value to be updated (see end of document for list of codes)

iii. 'Export Filtered Rows' should be selected
iv. Select 'Show Records' – If no records exist, exit the export process and go to Step 11. If records exist, continue to the next Step.
v. Click 'Next'
d. Export Summary and Output Options - Ensure items are identified as noted on screenshot below and click 'Export' – Save the file, as it will be needed in a following Step.

Combining the Quick Export file and the Gifted file
4. Open Gifted export file with EXCEL
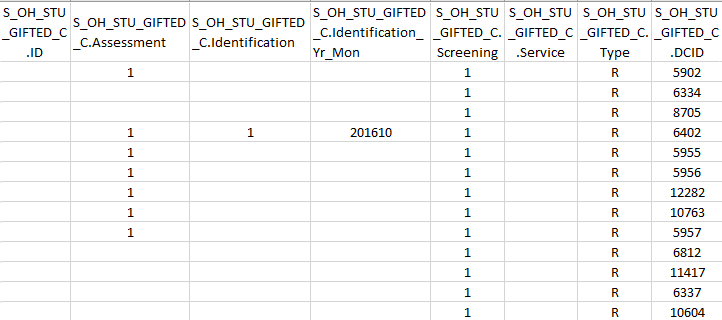
5. Cut the following column, S_OH_STU_GIFTED_C.StudentsDCID, select column STUDENTS.LastFirst , right click, and select Insert Cut Cells. The column headings should now appear as follows:

6. Open Quick Export file and copy the data to the EXCEL document in the columns noted in the prior Step.
7. Sort the file using either the student name or DCID to find duplicate student names or DCIDs. If a student has TWO rows either delete the row with no data entered in the S_OH_STU_GIFTED_C.ID column or simply do not populate the row without data in the S_OH_STU_GIFTED_C.ID column. Be sure to make sure the S_OH_STU_GIFTED_C.Type column is also blank. YOU CAN ONLY HAVE ONE ROW PER S_OH_STU_GIFTED_C.Type. IF A ROW ALREADY HAS A S_OH_STU_GIFTED_C.ID, THAT ROW MUST BE UPDATED. The rows without a S_OH_STU_GIFTED_C.ID are from the Quick Export file copied in Step 6.
8. Populate the columns requiring a checkbox with '1' to denote students were screened and/or assessed and/or identified. If Identified is being updated be sure to include the date (YYYYMM), as well.
9. Populate the Type column with the gifted type (again for the purposes of this example, 'R' for Reading was used.) for new rows.

10. Once completed, save file as CSV (comma delimited)(*.csv) and continue with Step 12.
11. If the Gifted table export did not produce any gifted records for the gifted type = R, follow these steps:
Open Quick Export file in EXCEL or copy the text file data to an EXCEL worksheet.
Rename column header, STUDENTS.DCID with S_OH_STU_GIFTED_C.ID
Add the following column headers:
S_OH_STU_GIFTED_C.Assessment
S_OH_STU_GIFTED_C.Identification
S_OH_STU_GIFTED_C.Identification_Yr_Mon
S_OH_STU_GIFTED_C.Screening
S_OH_STU_GIFTED_C.Service
S_OH_STU_GIFTED_C.Type
Populate the columns requiring a checkbox with '1' to denote students were screened and/or assessed and/or identified. If Identified is being updated be sure to include the date (YYYYMM), as well.
Populate the Type column with the gifted type (again for the purposes of this example, 'R' for Reading was used.)
f. Once completed, save file as CSV (comma delimited)(*.csv) and continue with Step 12.
Importing the .CSV file – Updating Current Year Student Gifted Records
12. Go to the Data Import Manager - Start Page > System > Page and Data Management > Data Import Manager
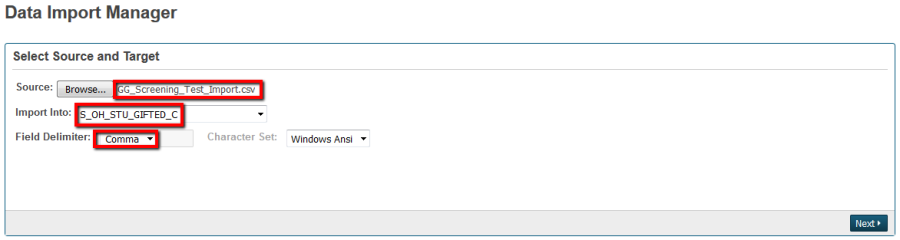
13. Select Source and Target
Source: Browse for the CSV file to be imported
Import Into: S_OH_STU_GIFTED_C
Field Delimiter: Comma
Character Set: Windows Ansi
14. Click 'Next'
15. Verify mapping – LastFirst will be blank (not shown in screenshot)
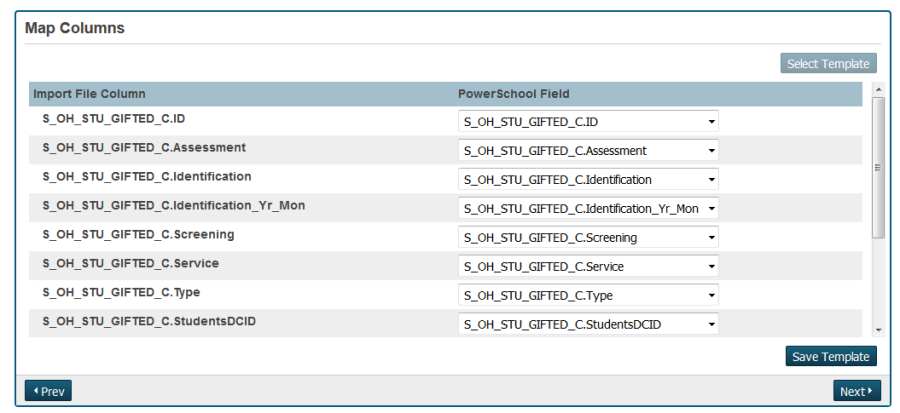
16. Click 'Next'
17. Select Options – Select as noted on the Screenshot below and click 'Import'. (Refresh screen to see import results)
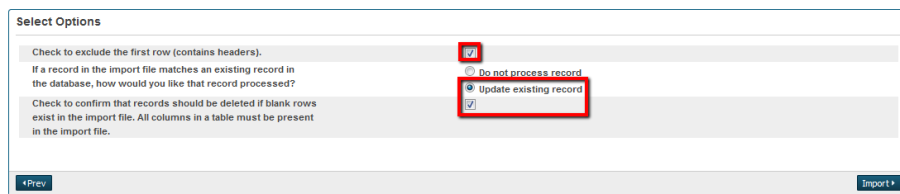
18. Verify the import populated the current year records.
Legend – Gifted Type Codes
A = Visual/Performing Arts
C = Creative Thinking Ability
D = Superior Cognitive Ability
H = Social Studies
M= Mathematics
R = Reading
S = Science