
Create Incident
Discipline incidents can be created at the school or district level. If an incident occurs on school grounds, PowerSchool recommends creating the incident while logged into that school. If the incident occurs within the district but is not related to a particular school, PowerSchool recommends creating the incident at the district level. The School Safety Survey and CRDC reporting must have a school associated to the Incident to report properly.
To use Incident Management for School Safety Survey and CRDC reporting, security groups must be granted access to the (NH/CRDC) Discipline^ Incident Type. Refer to System Help in PowerSchool for more information on how to set up group-level permissions.
How to Set Up Attendance Entry within Incident Management:
Incident Action Attendance provides the user with the ability to quickly enter attendance for the students involved in an incident using the Quick Incident or the Detailed Incident pages.
Instructions on Set Up for Attendance Entry within Incident Management.
How to Create Quick Incident Templates:
Creating Quick Incident Templates will allow users to quickly create an Incident with specific codes and subcodes selected in the template. Additional information can be added to the Incident, the template allows for consistency and ease of creating an incident.
Instructions on Creating Quick Incident Templates
How to Set Up Teacher Referrals:
Teachers can create a Teacher Referral for Incident Management in the PowerSchool Teacher Portal or through Observations in PowerTeacher Pro.
Enable Incident Creation in the PowerSchool Teacher Portal and PowerTeacher Pro.
-
Select District Management.
-
Select District Setup.
-
Select Additional System Preferences.
-
Select the Enable Incident Creation by Teachers checkbox to enable incident creation in the PowerSchool teacher portal or PowerTeacher Pro.
-
Click Submit.
Create Quick Incident
-
An Incident will be collected in the School Safety Survey when the Incident was created using the (NH/CRDC) Discipline^ Incident Type AND
-
There is a state-defined Action Code or
-
There is a state-defined Behavior Code or
-
There is both an Action and Behavior Codes that are state-defined
-
State-defined is when the Incident Code (i.e. Behavior Code, Action Code, Object Code) begins with (NH) or (NH/CRDC) and ends with a caret (^). If a code has subcodes that subcode is also a state-defined code.
-
An Incident will be collected for the CRDC federal reporting when the Incident Type (i.e. Behavior Code, Action Code, Object Code) contains a caret (^) in the code and the code begins with (NH/CRDC) or (CRDC).
-
-
Use the Create Quick Incident function to quickly and easily create a discipline incident. If changing a Teacher Referral to a state reportable Incident, the Quick Incident option is not an option, the Teacher Referral will be modified using the create detail incident instructions.
Access Create Quick Incident from Main Navigation:
-
Select People.
-
In the Student Administration section, select All Incidents.
-
Click the blue Create Incident button and choose Create Quick Incident. The system will remember the selection made and will default to that type of Create Incident type.
Access Create Quick Incident from Student Pages:
-
On the start page, search for and select a student.
-
Select Behavior.
-
Select Incidents.
-
Click the blue Create Incident button and choose Create Quick Incident. The system will remember the selection made and will default to that type of Create Incident type.
Create Quick Incident:
-
Log in to the district or school associated with the incident.
-
Navigate to People > Students > Student Administration > All Incidents. Or
-
Navigate to Student > Behavior > Incidents.
-
-
Click the blue Create Incident button and choose Create Quick Incident..
-
Once the selection is made, the system will default to that type of incident creation but can be changed to Create Detailed Incident by clicking the arrow and selecting that option.
-
-
Enter a Title and brief Description of the incident.
-
Select the (NH/CRDC) Discipline^
-
Select the Incident Date.
-
The Time Frame is not necessary for the School Safety Survey, but codes are available and can be used for district purposes.
-
Enter the Number of Participants and type the person preparing the Incident in the Prepared By field.
-
If at the district level, select the School (note: this option is not available if entering the Incident at the school level).
-
The Location and Location Description are not necessary for the School Safety Survey, but codes are available and can be used for district purposes.
-
Click the blue Next button.
-
Assign students, staff, and other participants, and their roles as needed.
-
If the Number of Participants entered was not enough to include all the participants, the additional participants will need to be added once the incident is created.
-
If using a template that has included Participant Attributes, select the applicable Participant Attributes. If not using a template, the Participant Attributes do not appear in the Create Quick Incident and will need to be added after the Quick Incident is created (see instruction 18).
-
-
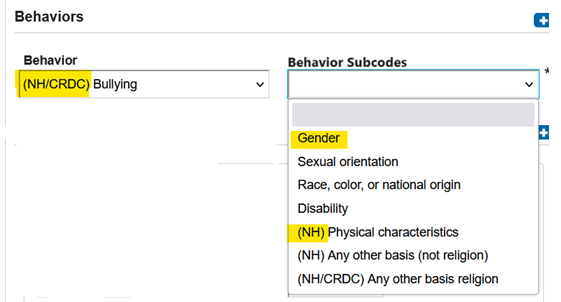
Choose the Behavior Code > Behavior Subcode(s).
-
Behaviors that relate to both School Safety Survey and CRDC reporting have a code or subcode that begin as (NH/CRDC). For behaviors required for the School Safety Report the codes and subcodes begin with (NH/CRDC) or (NH). For the behaviors that are only required for CRDC, the codes begin as (NH/CRDC) or (CRDC). If a subcode does not have a NH or CRDC identified, but the parent codes does, that means that code is also the same type of code as the parent code. For example, the Behavior Code of (NH/CRDC) Bullying has a subcode of Gender. Gender is needed for both NH and CRDC so it has the same affiliations that the parent code of (NH/CRDC) Bullying has. The subcode of (NH) Physical characteristics is only being used for the School Safety Report and so it begins with the (NH).
-
-
To add additional behaviors, click the Plus (+) icon found to the right of the Behaviors section.
-
-
Choose the Action Code > Action Subcode(s) and enter applicable action information.
-
Enter the Begin Date and End Date of the action. The End Date is not used in the School Safety Survey but will need to be entered if the district is using the option to Write Attendance for Incident Actions.
-
Select (NH) Full Days^ as the Duration Code. The Assigned Duration and Actual Duration can be entered in half-day increments (i.e. A half-day would be entered as 0.5; 2 days would be entered as 2.0, 3 ½ days would be entered as 3.5). The school safety report will only pull in Incidents that have a day or more in duration days.
-
Select the appropriate Action Attributes.
-
To add additional actions, click the Plus (+) icon found to the right of the Actions section.
-
-
If using a template select the Object Codes. If not using a template, or a template that did not include the Object Codes, the Object Codes will need to be added after the Quick Incident is created (see instruction 19).
-
If the number of participants was more than one, select the Next button to enter the information on the next participant and continue to click Next until all the participants’ information has been created.
-
Save the Incident.
-
Edit the Incident and add the Participant Attributes in needed.
-
If a template was created and used, Participant Attributes can be added to the template and this additional step would be done during the Create Quick Incident.
-
-
Edit the Incident and add the Object Codes in needed.
-
If a template was created and used, Object Codes can be added to the template and this additional step would be done during the Create Quick Incident
-
-
If the Attendance in Incident Management is setup up, do the following to enter attendance:
-
Navigate to the Attendance Related Actions section.
-
Click the Edit (pencil) button of the attendance related action you want to work with.
-
Click Enter Attendance.
-
To set attendance for the entire date range:
-
Choose the Attendance Code you want to enter.
-
Click Set All for Range to enter attendance for the entire date range.
-
Click OK.
-
-
To set attendance within the date range:
Note: When entering meeting attendance, if the date range spans multiple weeks, click Previous Week or Next Week to view.
-
Choose the Attendance Code you want to enter.
-
Enter daily or meeting/interval attendance as needed.
Note: If enabled, Clock In/Clock Out is available with meeting/interval. -
For each different attendance code you want to enter, repeat step a and step b.
-
-
Click OK.
-
-
Save the Incident.
Refer to Create Quick Incidents in PowerSchool Admin Help documentation for more information.
Create Detailed Incident
An Incident will report as a state reporting discipline when the incident has an Incident Type with a description containing a caret (^), the Behavior Code has a State Report Code, and the ‘(MSDS) Exclude from State Reporting^’ Attribute is not selected.
Use the steps below to create a new incident and populate the Incident Description portion of the incident when selecting the Create Detailed Incident option.
-
Log in to the school or district associated with the incident.
-
Navigate to People > Students > Student Administration > All Incidents. OR
-
Navigate to Student > Behavior > Incidents.
-
-
Click the Create Incident arrow and choose Create Detailed Incident.
-
Once the selection is made, the system will default to that type of incident creation but can be changed to Create Quick Incident by clicking the arrow and selecting that option.
-
-
If at the district level, select the School (note: this option is not available if entering the Incident at the school level).
-
Choose the (NH/CRDC) Discipline^ Incident Type in the Incident Type field.
-
Enter the Incident Date and Time based on when the incident occurred.
-
The Time Frame is not necessary for the School Safety Survey, but codes are available and can be used for district purposes.
-
Enter the Title and Description as needed for local use.
-
The Location and Location Description are not necessary for the School Safety Survey, but codes are available and can used for district purposes
-
Either add additional information, see below, or click Submit Incident to save the changes. Participant, Behavior, and Action must exist for the incident to be included in the School Safety Survey.
Incident Builder - Participants
Use the steps below to populate the Participants portion of an incident.
Add Student and Staff Participants
Use these steps to add a student or staff member who is in the PowerSchool system.
-
Click the Plus (+) button next to Participants. The Search for Student, Staff, or Other Participants dialog appears.
-
Enter the criteria for the search and click Search. The Results section is populated with matching participants.
-
Highlight the appropriate participant in the search results.
-
Click Add.
-
Choose a role from the Select Role(s) pop-up menu.
-
Click the Plus (+) button under Attributes. A Participant Attribute code pop-up menu appears.
-
Choose the appropriate Participant Attribute code from the menu.
-
Click Add Participant Attributes and enter the attributes that are needed for the Participant Role.
-
Either add additional information, see below, or click Submit Incident to save the changes. Participant, Behavior, and Action must exist for the incident to be included in the School Safety Survey.
-
Following instructions 1-9 for each participant involved in the incident.
Add Other Participants
Use these steps to add a participant who is not in the PowerSchool system.
-
Click the Plus (+) button next to Participants. The Search for Student, Staff, or Other Participants dialog appears.
-
Click Create Other.
-
Populate the First, Middle, Last names, position, age, and gender fields. This information should be defined, if known, for both Offenders and Victims, but is not needed for Witnesses. Reporters do not need to be defined.
-
Click Add.
-
Choose a role from the Select Role(s) pop-up menu. There must be at least one Offender per incident.
-
Click the Plus (+) button under Attributes. A Participant Attribute code pop-up menu appears.
-
Choose the appropriate Participant Attribute code from the menu.
-
Click Add Participant Attributes and enter the attributes that are needed for the Participant Role.
-
Either add additional information, see below, or click Submit Incident to save the changes. Participant, Behavior, and Action must exist for the incident to be included in the School Safety Survey.
Incident Builder - Incident Elements
Use the steps below to add behaviors, actions, objects, and attributes to the incident.
Click Submit Incident to save the changes after you have added all the required behaviors, actions, objects, and attributes.
Add an Attribute
Use the steps below to add attributes to the incident.
-
Click the Plus (+) button next to Incident Elements.
-
Choose Add Attribute from the pop-up menu.
-
Select the applicable attributes.
-
Click Add Attributes. Each attribute appears under the Incident Elements heading.
Add a Behavior
Use the steps below to add behaviors to the incident.
-
Click the Plus (+) button next to Incident Elements.
-
Choose Add Behavior from the pop-up menu.
-
Choose the appropriate Behavior Code from the pop-up menu and then choose the appropriate behavior subcode from the subsequent menu.
-
Behaviors that relate to both state and CRDC have a code or subcode that begin as (NH/CRDC). For behaviors required for the School Safety Report the codes and subcodes begin with (NH/CRDC) or (NH). For the behaviors that are only required for CRDC, the codes begin as (NH/CRDC) or (CRDC). If a subcode does not have a NH or CRDC identified, but the parent codes does, that means that code is also the same type of code as the parent code. For example, the Behavior Code of (NH/CRDC) Bullying has a subcode of Gender. Gender is also needed for both NH and CRDC so it has the same affiliations that the parent code of (NH/CRDC) Bullying has. The subcode of (NH) Physical characteristics is only being used for the School Safety Report and so it begins with the (NH).
-
-
Click Add Behavior. The behavior appears under the Incident Elements heading.
-
Click and drag the behavior to the appropriate offender(s).
-
Following instructions 1-5 to add additional behaviors involved in the incident.
Add an Object
Use the steps below to add objects (Weapons and Illegal Drugs) to the incident. This information does not report on the state General Collection or CRDC report, but is available for the district’s use.
-
Click the Plus (+) button next to Incident Elements.
-
Choose Add Object and Subcodes from the pop-up menu
-
Click and drag the object to the appropriate offender. The object appears under the name of the offender and remains listed under Incident Elements, and can be added to multiple offenders.
Add an Action
Use the steps below to add actions to the incident.
-
Click the Plus (+) button next to Incident Elements.
-
Choose Add Action from the pop-up menu.
-
Choose the appropriate Action Code from the pop-up menu and then choose the appropriate Action Subcode from the subsequent menu.
-
Enter the Begin Date and End Date of the action. The End Date is not used in the School Safety Survey but will need to be entered if the district is using the option to Write Attendance for Incident Actions.
-
Select (NH) Full Days^ as the Duration Code. The Assigned Duration and Actual Duration can be entered in half-day increments (i.e. A half-day would be entered as 0.5; 2 days would be entered as 2.0, 3 ½ days would be entered as 3.5). The school safety report will only pull in Incidents that have a day or more in duration days.
-
Select the appropriate Action Attributes.
-
-
Add additional information as applicable.
-
Click Add Action. The action appears under the Incident Elements heading.
-
Click and drag the action to the appropriate behavior or offender. The action appears under the behavior or offender and is no longer listed under Incident Elements.
-
Following instructions 1-6 to add additional behaviors involved in the incident.
Click Submit Incident to save the changes after you have added all the required behaviors, actions, objects, and attributes.
Enter Attendance:
Attendance must be setup for Incident Management.
-
Navigate to the Attendance Related Actions section.
-
Click the Edit (pencil) button of the attendance related action you want to work with.
-
Click Enter Attendance.
-
To set attendance for the entire date range:
-
-
Choose the Attendance Code you want to enter.
-
Click Set All for Range to enter attendance for the entire date range.
-
Click OK.
-
-
-
To set attendance within the date range: Note: When entering meeting attendance, if the date range spans multiple weeks, click Previous Week or Next Week to view.
-
-
Choose the Attendance Code you want to enter.
-
Enter daily or meeting/interval attendance as needed.
Note: If enabled, Clock In/Clock Out is available with meeting/interval. -
For each different attendance code you want to enter, repeat step 1 and step 2.
-
-
-
Click OK.