
Understanding the Ohio Student Contact Conversion Tool
Overview
The July 2014 Release includes a significant change related to student contact information for State reporting. The State now requires contact and contact address information to support Community School and E-Transcript reporting. LEAs can elect to continue using their existing contact pages, however the new student contact pages will be required to support the new Student Contact Record (FF) and Student Contact Address (FG) reports and there is no relationship between these new State contact pages and the current PowerSchool Demographics, Emergency/Medical, or Parents pages.
This section will address the use of the conversion tool PowerSchool State Reporting has developed to assist districts/schools in transferring their current contact information to the new contact tables alleviating the need to re-hand enter this information. This process can only be done one time. Before this process is started, the district must have a full understanding of how current contact information has been entered in the different parent/guardian and emergency groups as this will impact how the district will identify accurate field flags and use of default values.
NOTE: The individual(s) assigned this task will need access to how and where their data is currently being stored as it is crucial to associate/enter the data to the new data fields as it is currently being stored.
There are four steps to the conversion process:
Map Contact Data
Populate Validation Screens
Validate Results
Migrate to State Contact Tables
To start the conversion process, go to Start Page > District Setup > Ohio Student Contact Conversion
Step 1: Map Contact Data
Once you click on the Contact Data Mapping Screen link a page with three tabs, Relationship, Flags, and Contact Fields, will appear.
Beginning with the Relationship tab, create a New record. Create a name for the Mapping, i.e. Parent/Guardian 1 or Emergency Contact 1. The number of contacts the LEA has already created and wants to use will determine how many contact relationship records are to be created.
The State Codes are provided with their descriptions. These are the only fields to be used for this mapping process. When entering the data, it is important to type in the mapped value exactly how it currently appears in the database tables, which may not be the same as it appears in the drop down boxes on the PowerSchool Demographics, Emergency/Medical or Parents pages.
These relationship records will be used on the Contact Fields tab.
On the Flags tab the LEA will simply put the code in which signifies a yes or no response as it appears currently in their database, i.e., Y, Yes, or 1 for Yes responses, and N, No, or 0 for No responses.
On the Contact Fields tab, the LEA will create a new record for each of the relationship records created on the Relationship tab. Again the individual will need to know the database table/field names where these data are currently stored. A map link has been provided to assist in the mapping process. The Mapping Description should correlate to the relationship record simply to keep things aligned visually.
The Contact Sequence field is used to determine the order of contact. This will be used to populate both the FF and FG record reports.
As fields are being populated, it may be the LEA does not store all data fields available on this page – leave these fields blank.
Once this is completed for each of the Relationship records go to Step 2.
Step 2: Populate Validation Screens
This step, using the mapping the LEA has provided, populates the screen the LEA will use to select the contact and associated information that will be used for Ohio state reporting purposes. Once the LEA has confirmed all mappings, click on the Populate Validation Screens button. This process will take some time depending on the number of students and the number of contact groups identified.
Step 3: Validate Results
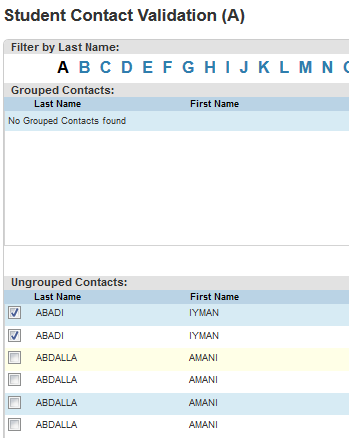
Once Step 2 has completed, click the Student Contact Validation link. The list is separated via the alphabet as can been seen in the partial Screen Shot #1. There is an 'ALL' category, which does include all contact records, however, it is recommended that the LEA go through the alphabet to create the contact records. When A-Z have been completed, select the 'All' category to see what, if any, records remain. The goal is to have all the desired 'Ungrouped Contacts' moved to the upper part of the screen - 'Grouped Contacts'.
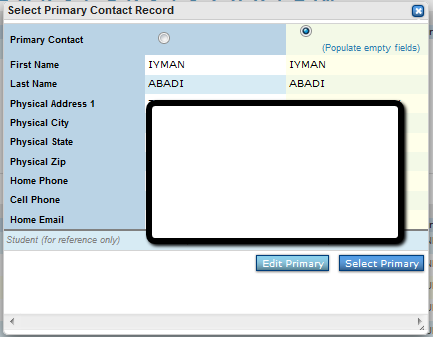
The process is simple, for multiple records for the same contact, select the records, by clicking anywhere on the line or the check box, as can be seen in Screen Shot #1. Next by clicking on the button, Combine/Edit Contact(s) a new screen with all selected records will be displayed side by side, see Screen Shot #2 (information other than name has been hidden). Once the Primary has been selected, radio button above the desired record, click on the Select Primary button. The record selected will be moved to the Grouped Contacts section of the page. At any time during this process records can be edited or ungrouped and regrouped, which will not be possible after Step 4. Once all duplicate contact records have been addressed, any remaining single records can be moved to the Grouped Contacts section by simply selecting the Create Individual Contact(s) button. There is no need to select the records themselves for these single contact records unless there are records the LEA does not want included.
Screen Shot #1.
Screen Shot #2.
Once all the validations have been completed the LEA is ready to move to Step 4.
Step 4: Migrate to State Contact Tables
Reminder: Once Step 4 is begun there is no going back. This process cannot be run again.
Once the LEA has confirmed Steps 1-3, the LEA can proceed to this step and click on the Submit button. This will move all the validated grouped data to the new State Contacts database tables.