The file used in this document to import Direct Certification information into PowerSchool is in the File Download of the MN CLiCS (Cyber-Linked Interactive Child Nutrition System) website. The Excel (With Eligibility) format is the specific file needed. When this file is imported it will overwrite the following fields in PowerSchool: [Students]LunchStatus (Lunch Status), [Students]lunchapplicno (Application #), [Students]Applic_Response_Recvd_Date (Date Responded),[S_MN_STU_X]Economic_Indicator (Economic Indicator), and [S_MN_STU_X]Direct_Cert_Eligible (Direct Cert Eligibility). .
This document assumes the user has knowledge of Microsoft Excel.
To import the Lunch Status, Date Responded, Application #, [S_MN_STU_X]Economic_Indicator (Economic Indicator), and [S_MN_STU_X]Direct_Cert_Eligible (Direct Cert Eligibility) into PowerSchool from the file:
-
Download the Excel (With Eligibility) format file from CLiCS.
-
Manipulate the Excel File (the Student Name and Student ID Number columns will not be mapped - they are in the file for information purposes only).
-
Remove the following FOOD AND NUTRITION SERVICE 1st row
-
Remove the rows after the last student record
-
Copy Free or Reduced column and name the new column title to S_MN_STU_X.Economic_Indicator
-
Add a Student_Number column.
-
The user will need to find a way to put the PowerSchool Student Number [Students]Student_Number into this field. The PowerSchool State_StudentNumber field and the Excel (With Eligibility) file Student ID Number column are both the Student MARSS Number. The user could download the student_number and State_StudentNumber from PowerSchool and use those two fields to do a VLOOKUP against the file Student ID Number column to populate the needed PowerSchool Student_Number in this column.
-
-
The ‘Date First Certified Free’ and the ‘Date First Certified Reduced’ columns need to be combined into one column. The date for either of these columns will be in the combined column titled Applic_Response_Recvd_Date
-
Remove the following columns:
-
Gender
-
Birth Date
-
Date Last Attended
-
Grade and School Last Attended
-
Local Use Data
-
Applicant
-
Match Method
-
-
Rename the following Titles:
-
Rename Case to lunchapplicno
-
Rename Free or Reduced to LunchStatus
-
Rename Eligible Program to S_MN_STU_X.Direct_Cert_Eligible
-
-
Use Find and Replace option and replace the following:
-
For LunchStatus column
-
For Reduced replace as RDC
-
For Free replace as FDC
-
-
For S_MN_STU_X.Economic_Indicator column
-
For this column replace the text with the appropriate code created in Start Page > District Setup > B File Codes Setup > Economic Indicator
-
-
For S_MN_STU_X.Direct_Cert_Eligible column (if there is not a replace code for the Eligible Program text, the text in the file is already mapped for the PowerSchool Import).
-
For Medicaid - Free replace with MF
-
For Medicaid - Reduced replace with MR
-
For Foster Care replace with FC
-
-
-
Save the file as a TXT file
-
-
Import the manipulated CSV file into PowerSchool
-
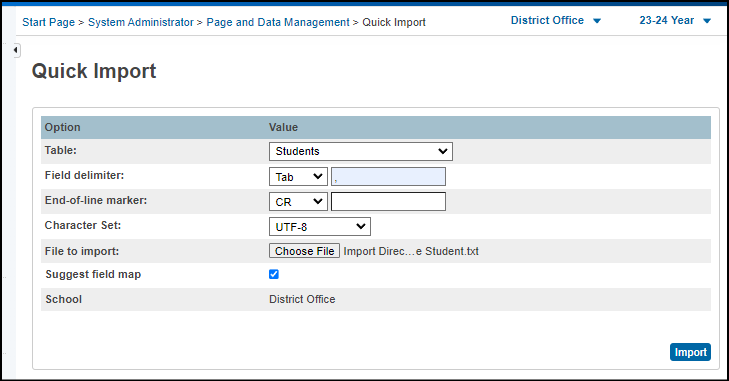
From the Start Page, select Importing & Exporting > Quick Import
-
For Table select Students
-
For Field delimiter select Tab
-
For File to import, click the Choose File and select the manipulated txt file
-
Select the Suggest field map
-
Click the Import button
-
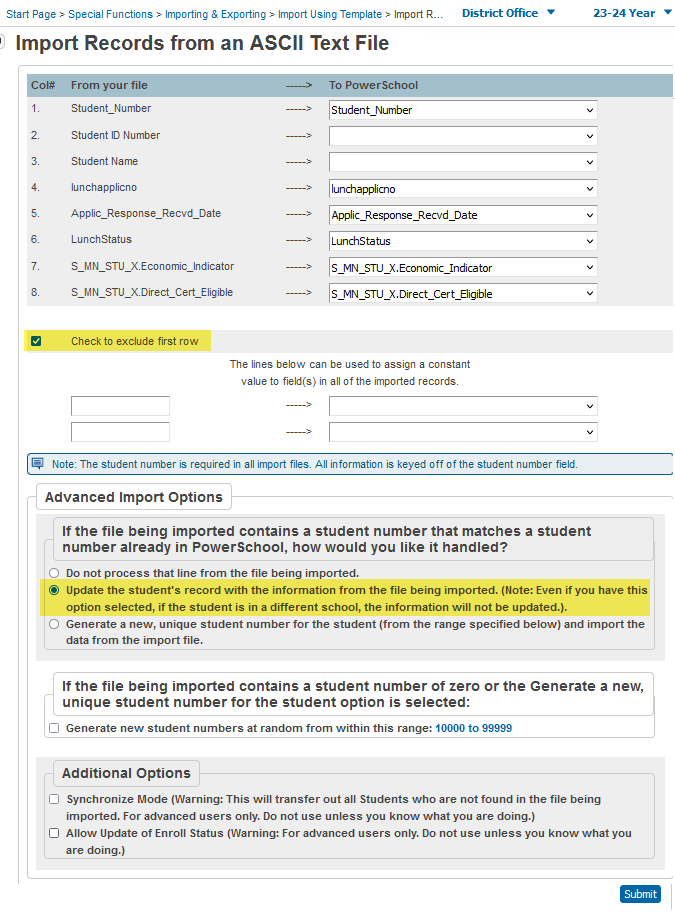
The mapping screen appears
-
If the column names were renamed as indicated above, the mapped fields will be right but they should be verified. The Student ID Number and Student Name should not be mapped.
-
Select the checkbox for the ‘Check to exclude first row’
-
In the Advanced Import Options section, select the ‘Update the student's record with the information from the file being imported’
-
Click the Submit button
-
A page appears that details the success of the import
-
-
The import will complete and the data can be verified on the Student > Lunch page and Student > State/Province - MN > Enrollment at a Glance > Economic Indicator
-
-
Screenshots of the Quick Import: